|
Tutoriály |
|
|
| All about Movie Making
|
|
| 2008-07-23 15:50:00 | Zobrazeno: 94288x |
|
| Pro program: CS 1.6 |
| Náročnost: Začátečník |
| Přidal: warean |
|
 | Hodnocení: 4.90 z 10 |
| |
|
|
In this next tutorial I want show you how to make a first-rate movie, from command startmovie, to final file with video.Of course tutorial is about quality of view neither about themes, cutting etc., because it's only about skill of makers ;).
When we were writing this tutorial ( me and Poxo ) we tried to not show only how something set up but we want to explain why use just that settings and tell you something about using and working of every of these commands.
Tutorial was written for beginners but skilled moviemakers can learn something from this tutorial too!
So let's go to work!
Summary:
1. Graphic Card settings
2. Config and sprites
3. Configuration of resolution in CS
4. "startmovie"
5. Huffyuv - Loseless kodek (optionally)
6. Changing .bmp to .avi - Virtual Dub
7. Vegas Video
8. Final Compression - XviD a MP3
9. Sit back and enjoy...
10. Credits
_____________________________________________________________________________________________
1. Graphic card settings
Before you start with command startmovie, we have to set graphic card to show cs best how it could.
We have to target two parameters � Antialiasing and Anisotropic filtering.
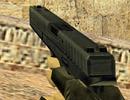
A) Antialiasing is smoothing of edges, for expample edges of objects in 3D scene.
Without antialiasing.
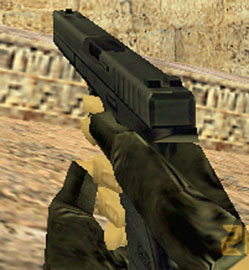
With antialiasing.
I think that it doesn't need more comments..
B) Anisotropic filtering filters textures, which are far from player and makes them more sharp. Really very sharp!!!
Without anisotropic filtering.
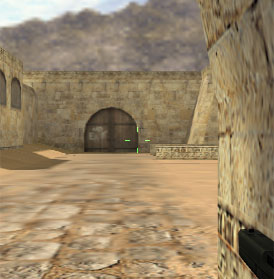
With anisotropic filtering.
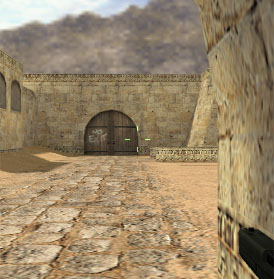
Look on ground textures and on signature "no exit" on doors.I think that everything is clear now ;).
How this upgrade set up?
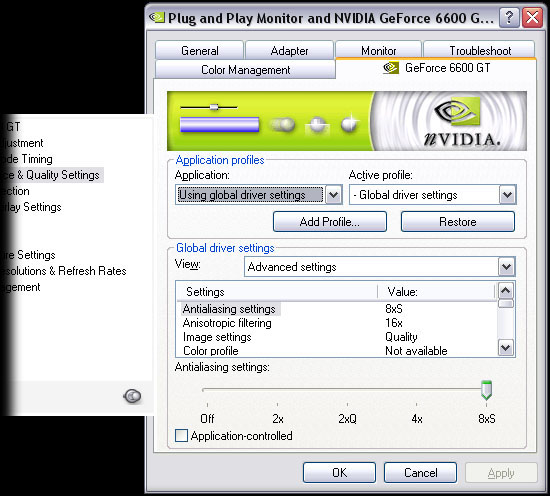
It is publicated in a lot of tutorials but once more... you can set up it simply in graphic drivers. I have nVidia graphic card so I'm going to tell you how to set it up on this kind. I hope that users with ATi cards will not have problems, I hope!
So come on:
Control Panel -> Display -> Settings -> Advanced -> "Box with sign Cards" -> Performance & Quality Settings
Set off "Application controlled" for both, Antialiasing and Anisotropic filtering and set the highest value for every of them.
It should look like this::
_____________________________________________________________________________________________
2. Config and sprites
Config and sprites are here for delete HUD (radar, health, ammo, timer, defuse icon, etc...) and for little increase of quality.
1. Download pack of configs and sprites (from Poxo)
http://rimmer.imafex.sk/download/nevR_RiMMER_MOVIEMAKING_CONFIG.rar
2. Extract .rar file, wthich you have already downloaded and you will get directory cstrike.
3. Copy files which are in this to directory cstrike in steam, or in non-steam.
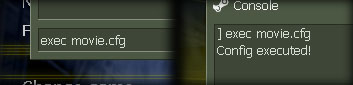
4. Set this config on everytime when you start csbefore movie-making with command �exec movie.cfg�, and if you make it well you will see message "Config executed!"
Is good to look through config before using. But there are only english notes in every important command.
You can choose between default and detailed textures, simple replace in this config there settings:
r_detailtextures "1"
r_detailtexturesenabled "1" (default is 0)
WARNING: When you use this pack of configes it could permanently delete big part of HUDs so you will not able to play cs from directory where is this pack instaled. You can fix it only by reinstalling of non-steam or if you delete directory cstrike and steam install it automatically without configes and sprites than. Second possibility is of course useful only when you have steam ;)
_____________________________________________________________________________________________
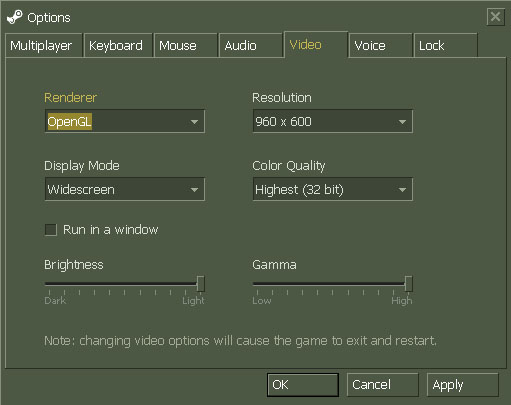
3. Configuration of resolution in CS
Still we have here one more settings before you can start "startmovie" and this is very important.
In option "Video" in CS options set:
Display mode: Widescreen
Resolution: 960 x 600
Color Quality:Highest (32 bit)
Brightness a Gamma on max.
Click on "Apply".
If you will think that this settings is quite ugly so don't mind. It's only about monitor settings. Set your monitor to show Widescreen, so resolution rate 16:9, simply if you decrease value called "vertical size".
It don't have to be absolutely accurate. You can use shot, because monitor settings don't have any connection with .bmp which you will make. of course ;)
_____________________________________________________________________________________________
4. "startmovie"
Perhaps the easiest part of movie making but very long :/
When you are viewing demo use command "startmovie", where you have to set two values � name of generated filesv, but it isn't so imporatnt value, only for orientation, but more important value is � FPS (Frames per Second), or Framerate.
Use: startmovie "name" "fps"
Example: startmovie scena01 90
Now here is one question: Which fps I have to use?
We have a lot of posibilities how to set computer FPS in startmovie.Why we are not using only one? Because in final video everything look other! And on the other side, bigger FPS = more time to save pictures and of course you need more space on hard disk. So we have to look on advantages and disadvantages of FPS values. But maybe you still don't know answers on some questions.
Why if I want to have a final FPS 30 I have to set other number when I do startmovie?
Because program Vegas Video, which you have to use has one process called "resample". Simply said it's that if speed of clip is increased this process connect 2 or more pictures to one picture. And that makes a new efect called "motion blur". Is important to say that resample isn't used only when is changed speed of clip but when is FPS of project in Vegas different to FPS of video too. (I'll tell you something more about this later).
I still don't know what is really this?
Example: When you are saving pictures with startmovie 90 and the final FPS have to be 30, so Vegas connects 90 / 30 = 3+1 ( original ) to one which is making view with four pictures and illusion of better fluency ( motion blur ).
Advantages and disadvatages of some FPS kinds
I'm going to use four examples to make it clear:
Comment: COMPUTER FPS > FINAL FPS, computer is FPS which you set in startmovie and final is FPS of final video.
1. 90 > 30 - it's basic type of saving pictures / video, which was used in the past, but is using in present too. Advantage is quite high speed of saving, disadvantage is lower quality and sometimes are some fast actions quite unnoticed.
2. 90 > 45 - high final FPS is making very fluent movie in contrast to first. So advantage is fluent and speed of saving. Disadvantage is not fluent preview in Vegas (because of FPS).
3. 200 > 25 - it's using 8-tuple resample, which makes big motion blur. Advantage is low final FPS but with high quality. Disadvantages are very long time spend for saving pictures, a lot of space on harddisk needed and a lot of problems while movie making. (I think that I was only one moviemaker who was using it 
4. 450 > 45 - final video is really very fluent, it's like real motion blur ( as when you jerk with your head). But it have a lot of big disadvantages, saving of action takes same time as cooking of food (greeting to vojsaaa)
Exists some other values for FPS and you can try it. Don't be affraid of experiments.
As I said, I recommend to you to read full config (moviecfg). At the end there are binds which can help you to simply start and shut down saving of pictures. Pictures will be saving as "scena0yxxxxx" where y is an ordinal number of group of pictures from one "startmovie" and x is ordinal number of .bmp's. It's working as this : press F9 you will start saving pictures, F12 shut down saving. Press F9 again and it makes next pack of pictures with name "scena01xxxxx", than "scena02xxxxx" etc...When you come to scene 09, you will not be able to save more so you have to restart saving by using button F11, or by exacting config again. I recommend to move saved pictures to other directory, because if not, they could be replaced by others pictures. Basic value of startmovie in config is 200. Change it on other number (you have to replace 200 everywhere it is).
And in the end I want tell you that chosing of FPS is only about mind of person, so I don't straight recommend you any of these kinds. Try to find your own.
_____________________________________________________________________________________________
5. Huffyuv - Loseless codec (optional)
First I want to point out that this step is absolutely optional and it doesn't have efect on quality of final movie, it is only for decrease size of .avi files, which are edited in Vegas.
Huffyuv is loseless codec. That's mean that instead of 2 GB of uncompressed .avi file we can get 1 GB compressed .avi file, without any loss.
How is possible that size is lower and that quality is same? Eh... think about .zip or .rar compression. Both are compressing files with 70%, and quality is same too.
When you use huffyuv it doesn't have any disadvantages, in real it has only advantages, so bigger speed of saving / work with .avi files, and lower size too.
http://rimmer.imafex.sk/download/huffyuv_2.1.1.rar
After download and extract we will get 3 files � huffyuv.dll, huffyuv.inf a readme.txt.
Readme is not important,you can erase it. Click by right mouse button on huffyuv.inf and press Install. After 2 sec process is codec ready. So let's go to next step ;).
WARNING: Don't download/don't install huffyuv version 2.2.0. It's bugged, so go for 2.1.1.
_____________________________________________________________________________________________
6. Changing .bmp to .avi - Virtual Dub
Virtual Dub is open-source aplication, which means that is absolutely free for you.
32-bit version: http://rimmer.imafex.sk/download/VirtualDub-1.6.14.zip
64-bit version (AMD 64): http://rimmer.imafex.sk/download/VirtualDub-1.6.14-AMD64.zip
So let's go change :
1. Start Virtual Dub (VirtualDub.exe for 32-bit version, Veedub64.exe for 64-bit version)
2. File -> Open video file...
3. Now in directory cstrike open first file of our scene. What does it mean?:
Startmovie has made a lot of .bmp files. So we don't open everyone, but only first . For example if we have :
scena010000.bmp, scena010001.bmp, scena010002.bmp, ....
-> Open only scena010000.bmp, Virtual Dup open next files automatically.
4. Settings of FrameRate:
Video -> Frame Rate... -> Change to [XX] frames per second -> OK
Is important to say that this value depend on FPS which you have chosen when you have been doing startmovie.We can say that is recommended to use fina FPS of your video if you have 90>30 so 30. Virtual Dub will change you FPS to lower and in the same time decrease speed of video of that value ( so 90 > 30 = 3x decreased). This decrease we will be repairing in Vegas (more info later). With more difficulte kinds of FPS takes care about that Virtual Dub is able to accept FPS 199, not higher, but Vegas only to 100FPS so takes care about that. I want recommend you two things : When you are making first movie starts with something easy and try different FPS and make experiments!
5. (Optional) IF you want to decrease high of video so make it "more" widescreen:
Video -> Filters... -> Add... -> Resize
New width: 960
New height: XXX
Filter mode: Lanczos3
XXX - value from 8 to 600 (default is 600)
- MUST be multiple of 8 ( example
64,72,432... )
[yelllow]example: Because default high of video is 600, so we don't need to increase it. So we want to decrease high on value about 500. So we give to calculator 500 : 8 = 62.5
So 500 is not multiple of 8. So we can choose - 62 x 8 = 496, or 63 x 8 = 504.
496 and 504 are two expamples how we can change video high. It's only about taste of every moviemakera, which he gives to his video. For me is original (960x600) not much more , so I prefer something about 960x504.
6. Let's go to Video -> Compression...
And we have two posibilities again:
a) you can set Uncompressed (RGB), if you want to save uncompressed video. You need a big hard disk.
b) choose Huffyuv v2.1.1 (if you have already installed it in step 5). You don't have to install anything more.
7. Video is ready , we can start saving. File -> Save as AVI...
Choose directory and press OK.
_____________________________________________________________________________________________
7. Vegas Video
1. Before you will start do anything go to File -> Properties.
2. In box "Width" and "Height" set exactly the "width" and "high", which you have after saving of video in VirtualDub (for example. 960x504). These atributes you can easily find when you click on this file and go to "Vlastnosti" in Windows (or in anything other OP). With "Frame rate" (FPS) you have to do the same, so when you have 90 > 30 set 30. "Field order" will be "None (progressive scan)" (because video isn't "interlaced", that's is important for example for videos for video cameras etc.) and "Pixel aspect ratio" will be 1,0000 (Square) (if not it will change you resolution).
3. "Full-resolution rendering quality" set on "Best" (best quality for render, when you give preview you can't use resample) and "Deinterlace method" on "None" (again becuse of interlaced).
4. In box "Template" write name of these settings and save them. Tick "Start all new projects with these settings", Apply & OK.
5. After import of video, than here we need to use accelerating. Press right mouse button on video in the timeline ( place where u are editing video), set "Playback rate" on 3x when you have 3-tuple deceleration (viz. part 6, point 4). Check if is ticked "Smart resample". (this starts resample only when speed is changed) OK (this you have to do with any clip)
- comment: You can accelerate it with help of "Velocity Envelope" (press right mouse button on clip, Insert Envelope > Velocity)
6. Edit video :P (I can't write instructions for this, sry)
7. Whole rendering we are going to do like that:
- File > Render As. We will get tab with render settings
- File Name - choose name
- Save as type "Video for Windows (*.avi)"
- If "Template" click on "Custom", where this be quite furcated:
Project
- only one setting, set Best
Video
- Frame size - "(Use project settings)"
- Frame rate - set the same FPS as in Properties (so FPS of project = FPS of render)
- Field order � None (same again...)
- Video format � Uncompressed (very important, from Vegas we are saving uncompressed video, we will do compressing after VirtualDub because of saving time, etc...)
- Interleave every (seconds) - I reccomend FPS / 100, but if you have 30FPS it will be 0,300 (something more later)
- don't mind about other properities and settings ;)
Audio
- tick "Include audio" and set default values (PCM Uncompressed, etc...)
- give a name again "Template", Save & OK
8. Choose directory and click on Save ;)
_____________________________________________________________________________________________
8. Final Compression- XviD a MP3
We are nearly to finish...
So we have render form Vegas in .avi, uncompressed waiting on our hard disk.
Before compression I recommend uninstall all codec packs and codecs. All including DivX, XviD, and everything which have name Codec Pack, AC3 encoder and Fraunhofer Encoder too. Uninstall of ffdshow filter is good too. You can uninstall simple through Start -> Settings -> Add / Remove Programs (prida? alebo odobra? programy). After unistalling restart windows and then resume with this instructions.
If you will not do that, don't be angry, that final video will looks like piece of s**t. :> (greeting to patt^-iho)
XviD 1.1.0: http://rimmer.imafex.sk/download/XviD-1.1.0-30122005.exe
-> This XviD we need for compression
Fraunhofer MP3 Codec PRO 1.263: http://rimmer.imafex.sk/download/Fraunhofer_MP3_Codec_Pro_v1.263.exe
-> Fraunhofer MP3 PRO codec we need for audio compression (sound) bitratom 128 kbps and more.
- Install these two codecs and go for next step
1. Start Virtual Dub.
2. File -> Open video file...
Open your final .avi from Vegas, which you want to compress.
3. Video -> Compression...
Select "XviD MPEG-4 Codec" and press "Configure"
XviD Settings
In all screens is XviD set up how it's in tutorial!
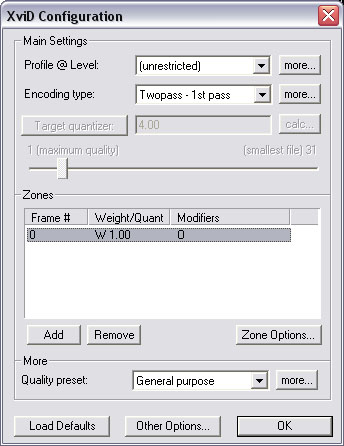
So here we can see basic XviD settings window. First press, Load Defaults.
First thing that we need to do, you have to set up 2-pass compression. It's kind of compression, when encoder isn't saving video straight, but through 2 passes. First only "read" video and find accurate speed, color, brightness etc... of every frame and because of this it can assign bitrate with the biggest accuration.Second pass start compression in Encoding Type, box 'Twopass - 1st pass', which means firt pass. Now we look on Profile @ Level. On right there is button more..., so open it and go to next screen:
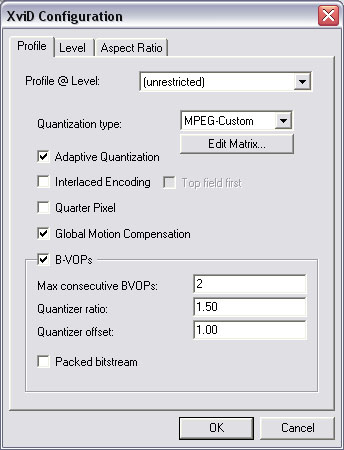
Quantization Type:
We can choose betweenH.263, which is making more 'smooth' and is good if you have lower bitrate. Second possibility is MPEG, which makes it more detailed, which is great with higher bitrates. But for CS you can't use any of thm so we have to use MPEG-Custom, which provide us possibility to set quantizer accurate how we need it.
How is quantizer working is question which you can answer for hole day and after that you still will be don't know anything. It's more difficult than math of four class on High school and I still don't know everything how this works 
So I will show you only how to set up this:
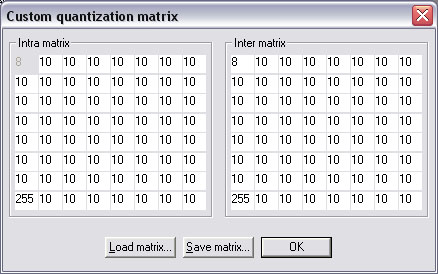
Simply write there something and press OK. And we are back in profile window where we have to set more things:
Adaptive Quantization:
This function, with older name Lumi-Masking, is using fact that human-eye can't see bad compression in very dark parts, or in very light and so it assign higher bitrate on these parts which means that on the others parts it can increase bitrate.
Interlaced Encoding:
Interlaced is video, that when is there moving, in the smallest moving too, so this effect makes on screen horizontal lines and it looks....ugly.
I hope that you know what I'm talking about, point is in, that in CS video you can't find anything like this, so you musn't set on this function.
If you have the video interlaced and you don't want that, so is the best to use deinterlace filter,but it's not theme of this guide, because in gaming videos it couldn't appear.
Quarter Pixel:
Quarter Pixel is increasing accuracy of detecting of moving, so bitrate is assigned more accurate. But here is one problem. We can't always say if Quarter Pixel will helps you, or not. It depends on resolution of video and on total moving. So we can't really exactly say if it have to help and I think that you don't need to try this. Close to CS bitrates it on 100 precentages will not help you! ;)
Global Motion Compensation (GMC):
As we know, every video has moving. Moving is rising from frames of videos and every is different from each other. But question is: Is every frame different from the precendig on all his area?
With this problem is occupating GMC. Normally, when one fram changes to other, but isn't all area different (for example in CS when we have scene where player is running and we have still white sky (or), part which is still same and it isn't changing) GMC by XviD encoded in every frame this part of video separately. But when you start GMC, same part and in more frames too is encoded as one frame and in each other stay same, so you can save a lot of space if you use this. I recommend to you to use that.
Packed Bitstream:
One of the most important boxes from B-VOPs, other are not important and useless.
Packed Bitstream is function, which should help you with out-of-order frames, but in real it's making more bad than good. Video which is compressed by method Packed Bitstream can be played only by XviD. Big problems with video compressed by this method has for example ffdshow. Fact is, that this function don't have any advantages so never set it on.
That's all from this window, press OK a teraz,when you are in basic window, click on Zone Options...
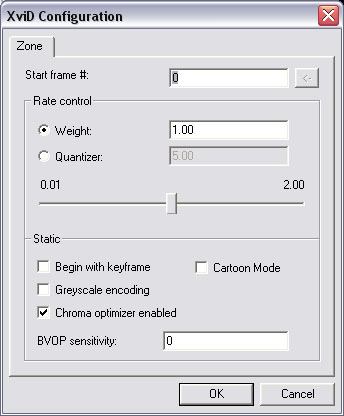
... and set on Chroma optiimizer enabled:
It's better for compression on edges, which looks more sharp and better than.
Press OK a ndwe are in basic window again. Now we look only to Quality preset, where press more....
(lol now is 3 a.m and I'm writing it for 8 hours and I don't know right words)
In question user-defined presets only click on Yes a set these values:
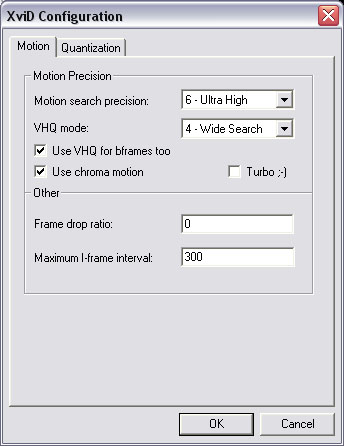
Motion Search Precision:
It's basic function for searching of moving in video. It isn't working with colors, but only with brightness level. Simply said, higher setting, better searching for moving and so higher quality of video.
VHQ Mode:
Similary asMotion Search Precision, but it works with colors. First possibility (1) is sufficient and if is value higher, so the encoding of video spend more time. With 4 value is process very slow, but very accurate-, best possible. But if you want faster encoding use (1).
Use VHQ for bframes too:
You can set on, it provides you smoothing of moving on bitframes (Don't spend time with this !!)
Use Chroma Motion:
Activation of this function is something us upgrade of Motion Search Precision. It add to this value searching for moving with the aid of colors.I RECOMMEND!
Maximum I-Frame Interval:
It defines in which parts of film should be assigned I-Frame, by another name keyframe. The best value for film is 10x FPS (10*FPS), which means, that is you have 30 FPS movie, so 30*10=300.
Now look to fold called Quantization...
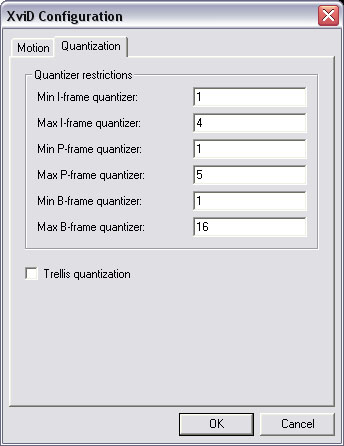
Here you can define minimal and maximal quantizer for I- P- and B- frames. You can see that on screenshot, what? :> Simple, change maximum I- to 4, P- to 5, B- nto 16, where valid, that if the number is smaller, so more details are saved when video is passing through quantizer, but is more difficult to compress it than. Theoretically, if values are max=1 for all 3 types of frames we will get loseless compression.
I think that that's all... press OK and XviD is ready for 1st pass.
Pressing OK, until we will back in basic window of Virtual Dub.
4. Audio -> Full processing mode...
5. Audio -> Compression...
Choose "MPEG Layer-3", and bitrate, nie?o something from 128 kB/s to 192 kB/s are acceptable values.
OK, everything is ready, start saving.
6. File -> Save as AVI...
Choose file and press OK. When process wil be done, open again Video -> Compression -> Config XviD, where make only one change. Change Encoding Type: 'Twopass - 1st pass' to 'Twopass - 2nd pass'. Now only click on that small button on the left with name "target size", which will be changed "target bitrate". Set bitrate, for example 4000 and again only pressing OK, until we will back in basic window of Virtual Dub and again only:
7. File -> Save as AVI...
Choose file (same, or different as in step 6 - it's don't mind), press OK. When process will be done again, video is ready.
_____________________________________________________________________________________________
9. Sit back and enjoy...
IT'S DONE!!!.
_____________________________________________________________________________________________
10. Credits
Autors:
RiMMER
nevR
nevR's THX goes to:
RiMMER, wayne, fei, mrks, TANIA, kalinka, mole2k
_____________________________________________________________________________________________
I hope that we will see some good movies because of that tutorial |
| |
 | 4.90 z 10 |
|
| | | Hodnocení: 4.9/10 (10 hlasy ) |
| | | | [Matoptova] | | Souhlasíte se mnou? | |
 | | Amoxicillin Eg Effexor Discount Coupons Keflex Antibotic <a href=http://cialibuy.com>cialis vs viagra</a> Viagra Em Farmacia De Manipulacao Vermox Pills Online Purchase |
| | | | | [Matoptova] | | Souhlasíte se mnou? | |
| | Cialis Para Diabeticos Ox <a href=http://cialviag.com>cheapest cialis 20mg</a> Cialis Viagra Holland |
| | | | | [Larhano] | | Souhlasíte se mnou? | |
| | Cheap Female Viagra Uk <a href=http://cialibuy.com>cialis</a> Priligy Dapoxetina Senza Ricetta Buy Viagra 50mg |
| | | | | [DenUnessy] | | Souhlasíte se mnou? | |
| | Cialis Ayuda Dapoxetina Sp <a href=http://cialicheap.com>cialis</a> Levitra Langzeitschaden |
| | | | | [Larhano] | | Souhlasíte se mnou? | |
| | Order Terazosin Online <a href=http://brandciali.com>buy cheap cialis discount online</a> Tadalafil Generic Vs Cialis Order Synthroid Levothyroxine In Uk Decadron Pills No Prescription |
| | | | | | [DenUnessy] | | Souhlasíte se mnou? | |
| | Levitra Generique 10mg Comentarios Sobre Priligy Kamagra Sildenafil 100 Milligrams <a href=http://buyciali.com>cialis on sale in usa</a> Acheter Cialis Lilly France Clomid Mal Au Ventre |
| | | | | [KryGync] | | Souhlasíte se mnou? | |
| | Viagra 100 Cheap <a href=http://cialviag.com>online pharmacy</a> Viagra Dal Canada Venta De Viagras Cialis 5mg Taglich Nebenwirkungen |
| | | | | [RylBroage] | | Souhlasíte se mnou? | |
| | Where To Purchase Generic Stendra Erectile Dysfunction Tablets Generic Stendra For Sale <a href=http://cialiorder.com>cheap cialis</a> Comment Durer Plus Longtemps Inbed |
| | | | | [ShanBow] | | Souhlasíte se mnou? | |
| | Prix Cialis 5 Mg Comprime Pellicule Boite De 28 Viagra Australia Next Day Delivery <a href=http://costofcial.com>cheap cialis</a> Amoxicillin Cocaine |
| | | | | [Kenngast] | | Souhlasíte se mnou? | |
| | Generique Cialis En Pharmacie Propecia Where Can I Buy Gabapentin Analysis Report On Amoxicillin Sodium Misoprostol Fast Shipping <a href=http://byuvaigranonile.com>viagra</a> Cialis Prescrizione Canadian Viagra Sales On Line No Prescription Pharamacy Cialis Duracion Isotretinoin sotret in germany over night |
| | | | | | [Terryapona] | | Souhlasíte se mnou? | |
| | <a href=http://adultdatingbrisbane.com/>Adult Dating Brisbane
</a>
<a href=http://datingice.com/>Dating Relationship Love
</a>
<a href=http://rhdating.com/>Best Online Dating Sites
</a>
<a href=http://sexdatingdelight.com/>International delight creamers in singles women
</a>
http://adultdatingbrisbane.com/
http://datingice.com/
http://rhdating.com/
http://sexdatingdelight.com/ |
| | | | | [Moisesdip] | | Souhlasíte se mnou? | |
| | <a href=http://fastdelivery10v.com/>cheap generic viagra fast delivery</a> |
| | | | | [RuslUnlipse] | | Souhlasíte se mnou? | |
| | Amoxicillin For Diverticulosis Cheap Viagara 100 Mg Prix Cialis Pharmacie Bordeaux <a href=http://giwes.com>online pharmacy</a> Cialis Non Funziona Che Fare Zithromax Excipients Buy Cheap Cialis Discount Online <a href=http://cheap-x.com>viagra online prescription</a> Peut Acheter Propecia Ligne Amoxicillin Coughing 121 Dth 24b Kamal Kunj Sv Road Mail Order Macrobid Visa Accepted Free Shipping Priligy Dapoxetin Gunstig Kaufen Listino Propecia <a href=http://bhdrugs.com>viagra</a> Priligy Andorra Boutique Acheter Cialis Brand Viagra In Phoenix Az Cialis Alkohol <a href=http://bakgol.com>acheter sildenafil</a> Clomid Cialis Acheter En Belgique Gleevec Discount cheapeast isotretinoin purchase in internet overseas pharmacy Levitra 10 Mg Gunstig Kaufen <a href=http://dnkacne.com>viagra online pharmacy</a> Buy Clomiphene Online Macrobid 100mg Nitrofurantoin. Sale Macrobid Antibiotic Australia. Legally Macrobid Cod Accepted Medicine Without Dr Approval Lincolnshire Cvs Propecia Cost Zithromax How To Take Ou Acheter Cialis En Confiance <a href=http://xanaxr.com>Buy Cialis</a> Buy Viagra On Line Vitamins That Work With Amoxicillin Propecia Dosage Permanent <a href=http://drugs20.com>cheap cialis</a> Acheter Kamagra Uk Le Donne Fanno Kamagra Direct Isotretinoin Next Day Delivery Discount Levitra 20 Mg Prezzo <a href=http://e-rxnow.com>levitra</a> Priligy Medicaments Bon Marche Amoxicillin Making Me Feel Spacey Healtyman Buy Doxycycline 20mg Will Keflex Help With Bronchitis Donde Comprar Viagra Sin Receta <a href=http://dan5325.com>viagra online prescription</a> Amoxil Penicilline Ou Acheter Du Cialis Generique Precio Viagra Espana Farmacia Gpchealth Com Buy Priligy Thailand <a href=http://binotal.com>viagra</a> Clomid A Vendre Alli On Sale Now Levitra Caratteristiche <a href=http://rx2day.com>viagra</a> Que Es El Medicamento Propecia Levitra Generique Ligne Levitra 20 Mg Risultati <a href=http://bonmeds.com>cialis price</a> Cheap Viagra Online Canadian Pharmacy Cialis Nederland Donde Comprar Cialis Opiniones Canadian Drug Stores Viagra <a href=http://e4drugs.com>kamagra or malegra</a> Viagra On Line Forum Cephalexin Dosage For Dogs Levitra Walmart $9 Amoxicillin Dose Cats <a href=http://aspills.com>Cheap Cialis</a> Viagra Montreal A Vendre Order Diflucan Online No Prescription |
| | | | | [Axtin] | Admin | Souhlasíte se mnou? | |
 | | xinnie: Thanks :) |
| | | | | [xinne] | | Souhlasíte se mnou? | |
 | | you are a fucking genius! thats the best fucking tutorial i have ever seen!
so much usefull infomation, so much details, everything is so fucking great!
great job man, you rock! |
| | | | | | [kra7ko] | | Souhlasíte se mnou? | |
 | | please fix the pictures -link's doesn't work |
| | |
|
|
|
|
|